How to Keep Specific Android Apps from Auto Updating
Get link
Facebook
X
Pinterest
Email
Other Apps
-
There is no way out to set this feature for any particular apps on Android and bond the others from being updated and this function will work for all the apps on your device collectively. But in case if you don’t want to go with the default behavior of auto updating and just want to keep specific apps from being Auto updated then there can be something done as making changes or adding new functions to the Android is not very tough and you just have to apply some of the methods. Now for adding this type of function you also have to apply some method on your device, that method have been described in this article below. Just go and get that method, apply that and keep specific Android apps from being updated.
How to Keep Specific Android Apps from Auto Updating
The method is quite simple and easy and you just need to follow the below step by step guide to a proceeding.
Steps to Keep Specific Android Apps from Auto Updating:
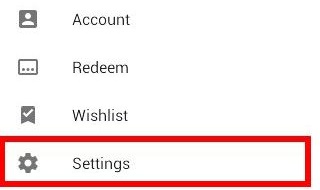
1. First of all, open the Google Play store on your Android device and then Go to it’s Main menu screen. On that screen, you would likely see many different options but you will have to go to the Settings option by clicking or tapping on it.
Keep Specific Android Apps from Auto Updating
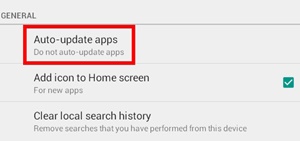
2. Now from the menu that arises on your screen just select up the Auto Update apps option, And after that, you would be able to see another option named “Do not auto-update Apps”. Now the thing that will happen is you won’t be able to change the auto-update function for some particular apps but you will be changing the whole of your installed apps not to Auto-update by themselves whenever the network is available.
Keep Specific Android Apps from Auto Updating
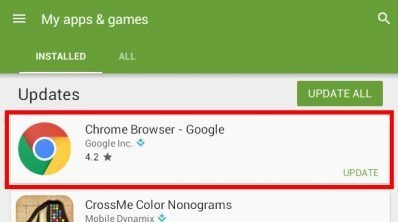
3. The thing that you can now do is you can now control up to the auto update for whole apps and whenever there shall be any update for any app it will be prompting you and then will be asking you for the permission to update the app.
4. If you might be willing to update any app, you can respond with “Update” option and if you don’t want any of the app to be updated you can cancel that action easily.
Are you trying to find out how to access the dark web and what is it? Well, look no further, we have gone and done the research so we could show you step by step the best and safest way how to access the dark net.We cover everything, from setting up Tor, how to choose a VPN, what not to do, finding the best sites to access, and extra steps to remain anonymous.
- Scrolling screenshots are handy for capturing the entire webpage without breaking the screenshot. For example, you can quickly capture the chat screenshot as the whole thread, etc. Many Android screenshot apps are available on the Google Play Store. These apps allow users to combine multiple screenshots to create a scrolling screenshot effect, but this can be tedious. This article will share some of the best Android apps for scrolling screenshots. 1. Stitch & Share Stitch & Share is a free screenshot app available on the Google Play Store for Android. It can take screenshots of more than your screen. It partly captures web page screenshots and stitches them together to form a scrolling screenshot. With Stitch & Share, it’s pretty easy to capture scrolling screenshots. 2. Web Scroll Capture Web Scroll Capture is an Android screenshot app that lets you capture a profile from any social media website, such as Facebook, Instagram, Twitter, ...
On Instagram, you can exchange texts, make voice or video calls, send voice notes on messages, and more. However, many features of Instagram require access to your microphone, which can be annoying if it doesn’t work. Recently, many Instagram users reported problems using the Microphone. According to them, the Microphone does not work during voice/video calls, while recording videos, etc. So, if you’ve just recorded Reels, stories, and videos without sound, you need to check and resolve the Microphone problems. Below, we have shared some of the best ways to fix the problem. 1. Relaunch the Instagram App If you are experiencing Microphone not working problem on Instagram for the first time, you need to relaunch the Instagram app. Relaunching the app will possibly rule out all bugs and glitches preventing the Instagram app from functioning correctly. You can close and reopen the Instagram app. After you relaunch the app, try recording your voice in the message t...


Comments
Post a Comment